Ramp angle is the lean of your foot within the ski boot, measured from the heel to the toe. A mild forward tilt enables keep you in an athletic stance, making it easier to control your skis. Most ski boots have a ramp perspective between four to 7 stages, designed to hold you balanced and solid on distinctive terrains. If the angle is simply too steep, you would possibly sense such as you’re leaning too far ahead, at the same time as a flatter attitude can make it more difficult to stay in an competitive skiing position.
Your body role on skis is without delay laid low with ramp angle. A higher ramp angle can assist if you have stiff ankles or a clearly upright posture, pushing your weight barely ahead for higher manipulate. However, if the ramp is too excessive, it may motive leg fatigue and knee pressure. On the other hand, a lower ramp angle offers greater freedom of motion and is often preferred via skiers with greater ankle flexibility. Finding the proper stability is vital for maintaining your knees, hips, and back aligned to reduce strain and enhance snowboarding performance.
Many ski boots permit customization of ramp perspective by means of adjusting the footbed or heel lifts. Professional boot fitters can help tweak the attitude to in shape your snowboarding fashion, leg length, and natural stance. If you regularly feel such as you’re falling backward or struggling to engage your skis well, your ramp perspective may want adjusting. A nicely-balanced ramp perspective ensures better control, smoother turns, and a more cushty snowboarding revel in.
How Should New Ski Boots Feel?
When you’re trying on new ski boots, getting the right fit is crucial for comfort, performance, and safety on the slopes. Ski boots should feel snug but not painful, and they should provide the right balance of support and flexibility. Here’s a breakdown of how your new ski boots should feel, including what to do if they’re too tight, too big, or just right.
i. Too Tight
If your ski boots feel too tight, here’s what you might experience:
- Toes: Your toes are squished against the front of the boot, causing discomfort or pain.
- Pressure Points: You feel intense pressure on specific areas, like the sides of your feet or your instep.
- Circulation Issues: Your feet feel numb or tingly due to restricted blood flow.
What to Do:
- Loosen the buckles slightly to relieve pressure.
- If the boots still feel too tight, consider trying a larger size or a boot with a wider last (width).
- Consult a boot fitter to see if the boots can be stretched or adjusted.
ii. Too Big
If your ski boots feel too big, here’s what you might notice:
- Loose Fit: Your feet move around inside the boot, even with the buckles tightened.
- Lack of Control: You feel unstable or disconnected from your skis because the boots don’t transfer power effectively.
- Blisters or Shin Bang: Excess movement can cause friction, leading to blisters or shin pain.
What to Do:
- Try a smaller size or a boot with a narrower last.
- Ensure your heel is firmly seated at the back of the boot when trying them on.
- If the boots are slightly too big, thicker socks or custom insoles can help fill the extra space.
iii. Perfect Fit
The perfect fit feels snug but comfortable, with no pain or pressure points. Here’s what to expect:
- Toes: Your toes lightly touch the front of the boot but aren’t squished. You should be able to wiggle them slightly.
- Heel: Your heel stays firmly in place without lifting when you flex forward.
- Overall Feel: The boots feel tight but not painful, with no excessive pressure or movement.
What to Do:
- Wear the boots for 15-20 minutes to ensure they stay comfortable over time.
- Flex forward in the boots to simulate skiing and check for any discomfort.
- Remember, new boots will “pack out” slightly after a few days of skiing, so they should feel slightly tighter when new.
iv. The Shell Fit Test
The shell fit test is a simple way to check if your ski boots are the right size. Here’s how to do it:
- Remove the boot liner and place your foot inside the shell.
- Slide your foot forward until your toes touch the front of the shell.
- Use your finger to measure the space between your heel and the back of the shell.
How to Determine the Shell Fit:
- Less than One Finger (1-1.5 cm): This is an expert or racer-level fit. It’s very tight and responsive but may feel uncomfortable for beginners.
- One to One and a Half Fingers (1.5-2 cm): This is considered a good fit for most skiers. It offers a balance of comfort and performance.
- Two Fingers or More (2+ cm): The boots are too big and won’t provide the control or precision you need.
Finding the right fit for your ski boots is essential for a great skiing experience. Whether your boots feel too tight, too big, or just right, understanding how they should fit will help you make the best choice. Remember, the perfect fit is snug but comfortable, with no pain or excessive movement.
How To Put Your Boot on Properly
-
Loosen EVERYTHING: Before even thinking about sliding your foot in, make sure all buckles are completely open and the power strap (if present) is undone. Pull the tongue forward as far as it will go. The goal is to create the maximum opening possible.
-
Dry Feet, Thin Socks: Start with dry feet and wear ONLY ONE pair of thin, ski-specific socks. Avoid thick socks or double socks, as they can restrict circulation and reduce sensitivity. Make sure the socks are pulled up smoothly and aren’t bunched around your toes or ankles.
-
Position Your Foot: Sit down and aim your foot towards the boot opening. Use your hands to gently guide your toes into the boot. Wiggle your foot as you push it in to make sure it goes all the way back into the heel pocket.
-
Check Heel Placement: A crucial step! Once your foot is in the boot, stomp your heel firmly into the ground several times. This helps settle your heel back into the heel pocket of the boot.
-
Close the Buckles (Loosely at First): Start with the buckles around your ankle, closing them gently, just enough to hold your foot in place. Don’t crank them down yet! Then close the lower foot buckles. Finally, work your way up the boot, still tightening gradually.
-
Fine-Tune Buckle Tightness: Once all buckles are closed (loosely), stand up and flex forward at the ankles. Now, begin to tighten the buckles until you feel a snug, supportive fit. The goal is even pressure without creating any pressure points or cutting off circulation. A good rule of thumb: you should be able to slide a finger between the buckle and the shell.
-
Adjust the Power Strap: If your boot has a power strap (Velcro strap at the top), tighten it snugly around your shin. This strap helps transfer energy from your legs to your skis. Don’t over-tighten, but make sure it’s secure.
-
Flex and Adjust Again: Flex your knees and ankles like you’re skiing. Check for any pressure points or areas that feel too loose. Fine-tune the buckle adjustments as needed until you have a comfortable, supportive fit that allows you to move freely within the boot but still provides good control.
What Does Ski Boot Flex Mean?
Ski boot flex is essentially a measure of how stiff the boot is. Think of it like this: imagine trying to bend a cardboard tube compared to a metal pipe. The cardboard tube is more flexible, meaning it bends easily, while the metal pipe is much stiffer and harder to bend. Ski boot flex works in a similar way, indicating how much force it takes to bend the boot forward at the ankle. This forward flex is crucial for controlling your skis.
The flex number is usually printed on the side of the boot and is given as a number, often ranging from 60 to 140+ for adults. Lower numbers represent softer, more flexible boots, while higher numbers indicate stiffer, more rigid boots. A softer flex allows for easier bending and is generally more comfortable, while a stiffer flex offers greater responsiveness and power transfer to the skis. It’s important to understand that flex ratings aren’t standardized across all brands, so a flex 100 boot from one brand might feel different than a flex 100 boot from another.
So, why does flex matter? It directly affects how much control you have over your skis. When you lean forward, the boot flexes, transferring your weight and energy to the edges of your skis, allowing you to turn and control your speed. A stiffer boot will respond more quickly and precisely to your movements, which is beneficial for aggressive skiers who want immediate feedback and maximum power. A softer boot, on the other hand, will be more forgiving and easier to initiate turns, making it a good choice for beginners or those who prefer a more relaxed style.
Choosing the right flex is a crucial part of selecting ski boots. A boot that’s too stiff will be difficult to flex, making it hard to initiate turns and potentially tiring you out quickly. A boot that’s too soft won’t provide enough support or responsiveness, leading to a loss of control, especially at higher speeds or on challenging terrain. It’s all about finding that sweet spot where the boot flex matches your skill level and skiing style.
Main Factors Affecting Boot Flex Choice
Several key factors should influence your boot flex choice. Your skill level is the most important. Beginners typically benefit from softer flexes (around 60-80 for men, 50-70 for women), while intermediate skiers can move up to medium flexes (80-100 for men, 70-90 for women). Advanced and expert skiers often prefer stiffer boots (100+ for men, 90+ for women). Your body weight and strength also play a role; heavier and stronger skiers generally require stiffer boots to provide adequate support. Finally, your skiing style matters; if you enjoy aggressive, high-speed carving, a stiffer boot will be ideal, while if you prefer a more relaxed, cruising style, a softer flex will be more comfortable and appropriate.
-
Skill Level:
-
Body Weight:
-
Strength:
-
Skiing Style:
Beginner/Intermediate: Soft Flex Boots
Imagine learning to dance. You wouldn’t start with a tango’s sharp turns, would you? You’d begin with gentle steps, feeling the rhythm. That’s what a softer flex boot provides – a gentle embrace that doesn’t demand perfection. As a beginner or early intermediate, you’re sculpting your foundation, gliding down green and blue runs, discovering the feel of the snow. A forgiving boot, flexing with minimal effort, becomes an extension of your learning, allowing you to connect with the mountain at your pace. Think of it as a supportive friend, encouraging you to explore without judgment. For men, this translates to a flex range of 60-80; for women, 50-60.
The Developing Artist: Medium Flex Boots
You’ve moved beyond the basics. Now, you crave more control, more expression. This is where the medium flex boot steps in. As you transition into an intermediate/advanced skier, you’re starting to carve turns, explore steeper terrain, and feel the thrill of controlled speed. A medium flex boot provides a balance of support and responsiveness, acting like a painter’s brush – allowing you to apply pressure and create precise lines on the snow. It’s the tool that transforms potential into performance, enabling you to confidently navigate more challenging slopes. Men should look for a flex range of 85-100; women, 65-80.
The Master Sculptor: Stiff Flex Boots
The mountain is your canvas, and your skis are your chisels. You’re an advanced skier, carving trenches into the snow with power and precision. At this stage, you need a boot that can handle the forces you generate – a stiff flex boot that acts as a direct extension of your will. It provides immediate feedback, allowing you to react instantly to changes in terrain and maintain control at high speeds. It’s about efficiency, transferring every ounce of energy into the turn. These skiers are at the top of their game, looking for that edge. Men will typically choose a flex range of 110-120, while women land between 85-100.
The Maestro: Very Stiff Flex Boots
For the expert, the racer, the individual pushing the limits, a very stiff flex is not a choice, but a necessity. Like a Formula 1 car, these stiff boots are built to withstand extreme forces and provide unparalleled control at breakneck speeds. It is built to perform well and ensure the skier does also. For men, finding a very stiff boot above 130+ is what they need, and for women, anything above 110+ will do.
Beyond Skill: Fine-Tuning the Fit
It’s not just about skill; it’s about your individual needs. If you’re a larger skier (over 90kg/200lbs), consider bumping up a flex level to ensure adequate support. Conversely, if you’re lighter (under 50kg/115lbs), a softer flex might be more comfortable and manageable. Also, think about your body’s mobility. Even if you’re a skilled skier, if you have decreased mobility, you might benefit from a slightly softer flex. Flex is a partnership between you and the boot, and your body is the first to feel.
The Little Shredders: Flex for Kids
Remember to consider lighter and more flexible options designed specifically for kids, allowing them to develop their skills without being overpowered by their equipment.
Can I Change the Flex of My Boot?
While you can’t magically transform a soft boot into a stiff one (or vice-versa), there are a few things you can do to slightly alter the perceived or effective flex of your ski boot. It’s important to understand that these modifications usually provide subtle adjustments, not dramatic changes. Here’s a breakdown:
1. Buckle Tightness:
-
Easiest Adjustment: This is the most basic way to influence flex. Tightening the top buckles, especially the power strap (if your boot has one), will generally stiffen the boot’s feel. Looser buckles will provide a softer feel. Experiment with different buckle configurations to find what works best for you.
2. Power Straps/Boosters:
-
Effective for Stiffening: Replacing a standard power strap with a wider, more robust “booster strap” can significantly stiffen the upper cuff of the boot. Booster straps are elastic and allow for more progressive flex, as opposed to the on/off feel of over-tightening a standard strap. They provide a snappier, more responsive feel.
3. Tongue Stiffeners:
-
Targeted Stiffening: Some ski shops sell tongue stiffeners, which are plastic inserts that sit between the boot’s tongue and shell. These stiffeners add rigidity to the tongue, increasing the overall forward flex resistance. This is a more specialized adjustment.
4. Aftermarket Spoilers/Cuffs:
5. Professional Boot Fitting:
Important Considerations:
-
Limited Range: Keep in mind that you can only adjust the flex within a certain range. You can’t turn a beginner boot into an expert boot.
-
Potential for Damage: Some modifications, especially grinding, can permanently damage the boot if done incorrectly.
-
Comfort is Key: Don’t sacrifice comfort for stiffness. A boot that’s too stiff can be just as detrimental as one that’s too soft.
-
Professional Advice: Consulting with a qualified bootfitter is always recommended before attempting any significant flex modifications. They can assess your needs and recommend the most appropriate solutions.
Note: While some minor adjustments to boot flex are possible through buckle tightness, power straps, and tongue stiffeners, more significant changes require professional bootfitting and may still be limited. Choose your initial boot flex carefully, as it’s easier to slightly tweak a boot than to drastically alter its fundamental flex characteristics.
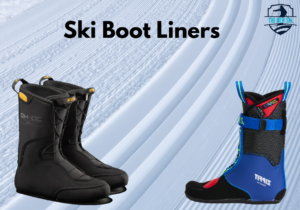
Ski Boot Liners
Ski boot liners are the soft, cushioned interior components of ski boots that provide comfort, warmth, and a crucial link between your foot and the hard plastic shell. They’re far more than just padding; they play a significant role in performance, fit, and overall skiing experience. Here’s a breakdown of ski boot liners:
Purpose and Function:
-
Comfort: Liners cushion your foot, reducing pressure points and preventing chafing inside the rigid boot shell.
-
Warmth: They provide insulation, trapping heat and keeping your feet warmer in cold conditions.
-
Performance: Liners transfer energy from your foot to the boot shell, enhancing responsiveness and control. A well-fitting liner improves the connection between you and your skis.
-
Fit: They fill the volume between your foot and the shell, ensuring a snug and secure fit. Liners can be heat-molded to conform precisely to the shape of your foot.
-
Shock Absorption: Liners help absorb impact from bumps and uneven terrain, reducing stress on your feet and legs.
Types of Ski Boot Liners:
-
Stock Liners: These are the standard liners that come with most ski boots. They’re generally made of foam or a combination of foam and synthetic materials. Stock liners can vary in quality and performance depending on the boot model.
-
Heat-Moldable Liners: Many modern ski boots come with heat-moldable liners. These liners are made from materials that soften when heated, allowing them to be custom-molded to the shape of your foot. This process is usually done in a ski shop with specialized ovens. Heat molding significantly improves fit and comfort.
-
Intuition Liners: Intuition is a well-known brand that specializes in high-quality aftermarket liners. Their liners are renowned for their superior heat-moldability, warmth, and performance. They use a proprietary closed-cell foam that conforms exceptionally well to the foot and retains its shape over time.
-
Custom Liners: These are the most advanced and expensive type of liners. They are custom-made to precisely match the shape of your foot, using a mold or scan of your foot. Custom liners offer the ultimate in fit, comfort, and performance.
-
Overlap vs. Tongue Liners: Reflect the boot style. Overlap boots typically have liners with a similar overlap construction for a snug, performance fit. Tongue liners are found in tongue boots and can offer more volume and easier entry/exit.
Materials:
-
Foam: A common material used in liners, providing cushioning and insulation. Different types of foam (e.g., EVA, polyurethane) offer varying levels of performance and durability.
-
Synthetic Fabrics: Synthetic fabrics like fleece or microfiber are used for the liner’s lining, providing a soft and comfortable feel against the skin.
-
Cork: Some liners incorporate cork, which is a natural material that molds well to the foot and provides good insulation.
-
Wool: Wool can be found in some liners for extra warmth and moisture-wicking properties.
Key Features to Consider:
-
Heat-Moldability: How well the liner can be heat-molded to your foot.
-
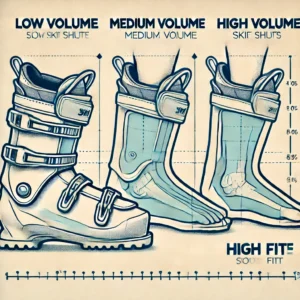
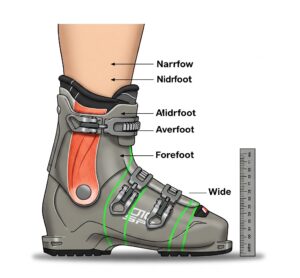
Volume: The amount of space the liner takes up inside the boot shell. Lower-volume liners are suitable for narrower feet, while higher-volume liners are better for wider feet.
-
Thickness: The overall thickness of the liner, which affects warmth and performance.
-
Tongue Construction: The design of the tongue, which can affect flex and comfort.
-
Closure System: The way the liner is secured inside the boot. Some liners have laces or Velcro straps for added adjustability.
-
Ankle Support: The level of support the liner provides around the ankle.
Replacing Your Liners:
Liners can wear out over time, losing their cushioning and support. Replacing your liners can significantly improve the fit and performance of your ski boots. Consider replacing your liners if:
-
They are compressed and no longer provide adequate cushioning.
-
They are torn or damaged.
-
Your feet are no longer comfortable in your boots.
-
You want to improve the performance of your boots.
Choosing the Right Liners:
Choosing the right ski boot liners is essential for a comfortable and enjoyable skiing experience. Consider your foot shape, skiing style, and desired level of performance when selecting liners. Consulting with a qualified bootfitter is highly recommended to ensure you get the best possible fit.
What Boot Features Matter?
Okay, let’s break down which ski boot features truly matter and why, focusing on Power Straps, Boot Buckles, the Cuff, Footbeds, Adjustable Flex, and Shock Absorbers:
1. Power Strap (Crucial for Performance):
-
What it is: A Velcro strap (or sometimes a buckle-closure strap) located at the top of the boot cuff, wrapping around your upper shin.
-
Why it matters:
-
Improved Energy Transfer: The power strap is key for transferring energy from your shin to the boot and ultimately to the skis. A tighter, wider power strap provides a more direct connection.
-
Increased Responsiveness: It helps close the gap between your leg and the boot cuff, minimizing lag and enhancing control.
-
Better Fore/Aft Balance: It assists in maintaining a balanced stance and preventing you from falling back on your heels.
-
Upgrade Potential: Upgrading a basic power strap to a wider “booster strap” (often elastic) is a common and effective way to enhance boot performance.
-
In essence: Don’t underestimate the power strap! It’s a simple feature with a significant impact on your skiing.
2. Boot Buckles (Essential for Fit and Comfort):
-
What they are: The primary closure system for the boot shell, allowing you to adjust the tightness and fit around your foot and lower leg.
-
Why they matter:
-
Precise Fit Adjustment: Buckles allow you to fine-tune the fit in different zones of the boot (ankle, instep, lower leg).
-
Secure Closure: Properly adjusted buckles ensure your foot is securely held in place, preventing unwanted movement and slippage.
-
Comfort and Performance: Comfortable, well-adjusted buckles prevent pressure points and enhance overall boot performance.
-
Micro-Adjustment: Look for buckles with micro-adjustment (small clicks or turns) to dial in the fit even more precisely.
-
In essence: Buckles are your primary interface for controlling the fit and feel of your boot. Quality buckles that are easy to use and offer precise adjustment are crucial.
3. Cuff (Impacts Support and Flex):
-
What it is: The upper portion of the boot shell that surrounds your lower leg.
-
Why it matters:
-
Lateral Support: The cuff provides lateral (side-to-side) support, crucial for edge control and stability.
-
Forward Flex: The cuff’s design and material influence the boot’s forward flex, determining how much resistance you feel when leaning forward.
-
Cuff Alignment: Many boots offer cuff alignment adjustment (canting), allowing you to adjust the cuff angle to match your leg shape and improve balance.
-
Height: The cuff height can also affect comfort and performance, especially for individuals with shorter or longer legs.
-
In essence: The cuff is a key determinant of the boot’s overall performance characteristics, affecting both support and flex.
-
What they are: The insoles inside the boot that provide support and cushioning for your feet.
-
Why they matter:
-
Support and Alignment: Stock footbeds are often thin and inadequate. Upgrading to a custom or aftermarket footbed can provide significantly better arch support, improve alignment, and reduce foot fatigue.
-
Improved Fit: A good footbed can take up extra volume in the boot, improving the overall fit, especially for narrow feet.
-
Comfort: A well-cushioned footbed enhances comfort, especially for long days on the slopes.
-
In essence: Don’t neglect your footbeds! Upgrading to a supportive and properly fitted footbed is one of the most cost-effective ways to improve the comfort and performance of your ski boots.
5. Adjustable Flex (Convenient, But Not Always Essential):
-
What it is: A mechanism (usually a screw or switch) that allows you to adjust the boot’s forward flex stiffness.
-
Why it can matter (but not always):
-
Flexibility: It offers the ability to fine-tune the flex to match different snow conditions or your skiing style.
-
Adaptability: It can be useful for skiers who want a softer flex for cruising and a stiffer flex for more aggressive skiing.
-
However: Adjustable flex mechanisms can sometimes add weight and complexity to the boot. In many cases, it’s better to choose a boot with the right flex for your typical skiing style, rather than relying on the adjustability.
-
In essence: Adjustable flex is a nice-to-have feature, but it’s not essential. Prioritize getting the right initial flex for your skill level and skiing style.
6. Shock Absorbers (Adds Comfort):
-
What they are: Some boots incorporate shock-absorbing materials (e.g., gel or foam) in the heel or other areas to dampen vibrations and impacts.
-
Why they matter:
-
Increased Comfort: Shock absorbers can reduce foot fatigue and improve comfort, especially on hard snow or bumpy terrain.
-
Reduced Impact: They can help absorb the impact from landings and bumps, protecting your feet and legs.
-
In essence: This is a nice feature, but not totally necessary.
Prioritization:
If you’re on a budget or need to prioritize, focus on:
-
Proper Fit (most important): A well-fitting boot is paramount.
-
Power Strap: Upgrade if possible.
-
Footbeds: Invest in quality footbeds.
-
Boot Buckles: Ensure they are durable and adjustable.
-
Cuff Alignment: Check if your boot offers this adjustment.
-
Adjustable Flex/Shock Absorbers: Nice to have, but not critical.
Related FAQ
Okay, here are the answers to your FAQs:
FAQ: Can My New Boots Be Stretched?
-
Answer: Yes, to a degree. Ski boots can be stretched, but it’s not like stretching leather shoes. Ski boot stretching involves modifying the plastic shell to create more space in specific areas. This is typically done by a professional bootfitter using specialized tools (e.g., heat guns, stretching machines). Stretching is usually targeted at pressure points around the toes, ankles, or instep. Keep in mind that stretching can weaken the shell if done excessively, so it’s best to have it done by an experienced professional. It’s also important to note that the liner will pack out and conform to your foot over time, which can create a little more room.
FAQ: Do Ski Boots Fit All Ski Bindings?
-
Answer: No, not all ski boots fit all ski bindings. The compatibility between boots and bindings is governed by several standards:
-
Alpine (ISO 5355): This is the most common standard for traditional alpine ski boots and bindings. Most modern alpine boots adhere to this standard.
-
GripWalk (ISO 23223): GripWalk boots have a special sole shape and require GripWalk-compatible bindings. Using a GripWalk boot in a non-GripWalk binding can be dangerous and compromise safety release. Most modern boots have GripWalk soles, but it is a relatively new feature.
-
WTR (Walk To Ride): This was an older standard that is now largely superseded by GripWalk.
-
Tech/Pin Bindings (ISO 9523): These bindings (used for touring/backcountry skiing) require boots with tech fittings (pin inserts) at the toe and heel. Tech bindings are not compatible with traditional alpine boots.
-
Frame Touring Bindings: These are alpine bindings with a touring hinge. They work with standard alpine boots, but are becoming less common.
Always ensure your boots and bindings are compatible before skiing. A ski shop can confirm compatibility and properly adjust the bindings.
FAQ: How Long Does It Take to Break In New Ski Boots?
-
Answer: The break-in period for new ski boots can vary depending on the boot’s construction, liner type, and how often you ski. Generally, expect a break-in period of 3-5 ski days. During this time, the liner will gradually mold to your foot, and any initial pressure points may ease up. Heat-moldable liners often require less break-in time. To speed up the break-in process, you can wear your boots around the house for short periods, flexing your ankles to help the liner conform. However, remember that persistent discomfort after a few ski days likely indicates a fit issue that requires professional attention from a bootfitter, not just more break-in time.
FAQ: How Long Do Ski Boots Last?
-
Answer: Ski boots typically last between 5 to 10 years, or roughly 150-200 ski days, depending on how often you ski, the type of terrain you ski on, and how well you care for them. The lifespan of a ski boot is often limited by the breakdown of the plastic shell, which can become brittle and lose its flex characteristics over time. Liners can also wear out, losing their cushioning and support. Regularly cleaning and drying your boots, storing them properly (in a cool, dry place, buckled loosely), and replacing worn-out components (e.g., footbeds, power straps) can help extend their lifespan. If you notice significant changes in the boot’s flex, fit, or overall performance, it’s time to consider replacing them.
When Should I Replace My Boot Liners?
Replacing your ski boot liners can significantly improve the comfort, performance, and fit of your boots. Here are some key signs that it’s time for a replacement:
-
-
Loss of Cushioning: If your liners feel thin, compressed, or lack cushioning, it’s a sign they’ve lost their ability to absorb impact and provide support. This can lead to foot fatigue and discomfort.
-
Packing Out: Liners will naturally pack out over time, creating more volume in the boot. If you find yourself cranking down the buckles to compensate for the extra space, or if your foot feels loose inside the boot, replacement liners can help restore a snug fit.
-
Tears or Damage: Any visible tears, holes, or damage to the liner will compromise its performance and insulation.
-
Persistent Odor: If your liners have developed a persistent odor that you can’t eliminate with cleaning, it’s time to replace them.
-
Decreased Performance: If you notice a decline in your skiing performance, such as reduced responsiveness or control, worn-out liners could be contributing to the problem.
-
Age: Even if your liners appear to be in good condition, they can degrade over time. A general guideline is to consider replacing your liners every 3-5 years, depending on how frequently you ski.
-
Improved Fit: Sometimes, even if your old liners aren’t fully worn out, upgrading to a higher-quality aftermarket liner (like an Intuition liner) can significantly improve the fit and comfort of your boots. This is especially beneficial if you have difficult-to-fit feet or are seeking enhanced performance.
How To Keep Your Feet Warm in Ski Boots?
Cold feet can ruin a ski day! Here are several strategies to keep your feet warm:
-
-
Wear Proper Socks: Invest in thin, moisture-wicking ski socks made of merino wool or synthetic materials. Avoid cotton socks, as they trap moisture and lead to cold feet.
-
Ensure Proper Boot Fit: Boots that are too tight restrict circulation, leading to cold feet. Make sure your boots have enough room for your toes to wiggle. Too loose is also bad as that will restrict bloodflow as well.
-
Dry Boots: Always start with dry boots. Use a boot dryer overnight to remove any moisture.
-
Heated Socks or Footbeds: Consider using heated socks or heated footbeds for extra warmth. These can be battery-powered or plugged into a power source.
-
Boot Gloves/Covers: Boot gloves or covers provide an extra layer of insulation, especially on very cold days.
-
Avoid Tight Buckles: Overly tight buckles restrict blood flow. Loosen the buckles slightly on the lift.
-
Move Your Toes: Periodically wiggle your toes inside your boots to stimulate circulation.
-
Take Breaks: Come inside for a warm drink and a break to warm up your feet.
-
Hand/Toe Warmers: Use disposable hand or toe warmers inside your boots for added heat.
-
Good Circulation: Avoid sitting for extended periods, which can restrict blood flow to your feet. Stand up and move around occasionally.
-
Stay Hydrated: Dehydration can reduce circulation. Drink plenty of water.
-
Avoid Sweating: Layer properly to avoid overheating and sweating, as moisture can lead to cold feet.
-
Aluminum Foil Hack: Wrap your socks in a layer of aluminum foil for added warmth.
Ski Boots Size Chart
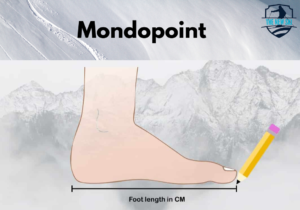
Ski boot sizes are typically given in Mondopoint, which represents the length of your foot in centimeters. Here’s a general size chart that converts Mondopoint to US and EU shoe sizes. Keep in mind that these are approximate conversions, and individual brand sizing may vary. Always try on boots in person or consult the manufacturer’s size chart for the most accurate fit.
| 22.0 |
4 |
5 |
35 |
| 22.5 |
4.5 |
5.5 |
35.5 |
| 23.0 |
5 |
6 |
36 |
| 23.5 |
5.5 |
6.5 |
37 |
| 24.0 |
6 |
7 |
37.5 |
| 24.5 |
6.5 |
7.5 |
38 |
| 25.0 |
7 |
8 |
38.5 |
| 25.5 |
7.5 |
8.5 |
39 |
| 26.0 |
8 |
9 |
40 |
| 26.5 |
8.5 |
9.5 |
40.5 |
| 27.0 |
9 |
10 |
41 |
| 27.5 |
9.5 |
10.5 |
41.5 |
| 28.0 |
10 |
11 |
42 |
| 28.5 |
10.5 |
11.5 |
43 |
| 29.0 |
11 |
12 |
43.5 |
| 29.5 |
11.5 |
12.5 |
44 |
| 30.0 |
12 |
13 |
44.5 |
| 30.5 |
12.5 |
13.5 |
45 |
| 31.0 |
13 |
14 |
46 |
| 31.5 |
13.5 |
14.5 |
46.5 |
-
Wear ski socks: Put on the ski socks you’ll be wearing in your boots.
-
Stand against a wall: Place your heel against a wall on a flat surface.
-
Measure the length: Have someone measure the distance from the wall to the tip of your longest toe in centimeters.
-
Repeat for both feet: Measure both feet, as they may be slightly different in length. Use the larger measurement.
Note: Mondopoint is a starting point. Boot fit is about more than just length; width, volume, and foot shape also play a role. Professional boot fitting is highly recommended to ensure a proper and comfortable fit.
Conclusion:
Choosing the right ski boots is a critical investment in your skiing enjoyment and performance. It’s a decision that shouldn’t be rushed or taken lightly. Understanding your skill level, skiing style, foot shape, and the key features of ski boots is paramount. Don’t rely solely on size charts; prioritize a professional boot fitting for the best possible outcome. A properly fitted boot will provide comfort, support, and control, allowing you to confidently tackle the slopes and fully experience the joy of skiing. Remember, the right boots are an extension of yourself, enabling you to unlock your potential and make the most of every run. Ultimately, prioritizing expert advice and taking the time to find the perfect fit will elevate your skiing experience from frustrating to exhilarating.